走进 vLLM(一):LLM Engine 与 Engine Core
一个现代高吞吐 LLM 推理系统的最小内核长什么样:从一次离线 generate 调用出发,拆开 LLM Engine 的构造函数、generate 函数、Scheduler,以及一次 forward pass 里到底发生了什么——顺带把 paged attention、continuous batching、KV cache block 这些词讲成人话。
本篇属于系列 走进 vLLM:高吞吐 LLM 推理系统解剖 · 第 1 篇
原文:Inside vLLM: Anatomy of a High-Throughput LLM Inference System,作者 Aleksa Gordic,2025-09-05 发布于 vLLM 官方博客,首发于作者个人网站。
本站是中英对照排版:左栏是英文原文,右栏是对应的中文译文。不好翻译的术语(paged attention、continuous batching、prefix caching、specdec、KV cache 等)保留英文写法;原文配图全部保留,并标注出处。
本文是系列《走进 vLLM:高吞吐 LLM 推理系统解剖》的第 1 篇,共 5 篇。
From paged attention, continuous batching, prefix caching, specdec, etc. to multi-GPU, multi-node dynamic serving at scale
从 paged attention、continuous batching、prefix caching、specdec,到多机多卡的大规模动态服务
In this post, I’ll gradually introduce all of the core system components and advanced features that make up a modern high-throughput LLM inference system. In particular I’ll be doing a breakdown of how vLLM [1] works.
在这篇文章里,我会循序渐进地介绍构成一个现代高吞吐 LLM 推理系统的全部核心组件和高级特性。具体来说,我会拆解 vLLM [1] 是怎么工作的。
This post is the first in a series. It starts broad and then layers in detail (following an inverse-pyramid approach) so you can form an accurate high-level mental model of the complete system without drowning in minutiae.
Later posts will dive into specific subsystems.
这是系列文章的第一篇:它先讲得宽,再一层层补细节(也就是倒金字塔的写法),目的是让你在没被细枝末节淹死的前提下,先对整套系统形成一个准确的高层心智模型。后续的文章会逐个深入具体子系统。
This post is structured into five parts:
全文分成五个部分:
- LLM engine & engine core: fundamentals of vLLM (scheduling, paged attention, continuous batching, etc.)
- Advanced features: chunked prefill, prefix caching, guided & speculative decoding, disaggregated P/D
- Scaling up: from single-GPU to multi-GPU execution
- Serving layer: distributed / concurrent web scaffolding
- Benchmarks and auto-tuning: measuring latency and throughput
- LLM engine 与 engine core(本文):vLLM 的基础设施(scheduling、paged attention、continuous batching 等)
- 高级特性 与 speculative decoding、disaggregated P/D:chunked prefill、prefix caching、guided & speculative decoding、disaggregated P/D
- 横向扩容与分布式服务:从单卡执行到多机多副本,以及分布式的并发 Web 框架
- Benchmark 与自动调参:如何测量延迟与吞吐
说明
- Analysis is based on commit 42172ad (August 9th, 2025).
- Target audience: anyone curious about how state-of-the-art LLM engines work, as well as those interested in contributing to vLLM, SGLang, etc.
- I’ll focus on the V1 engine. I also explored V0 (now deprecated), which was valuable for understanding how the project evolved, and many concepts still carry over.
- The first section on LLM Engine / Engine Core might be a bit overwhelming/dry - but the rest of the blog has plenty examples and visuals. :)
说明
- 本文的分析基于 commit 42172ad(2025 年 8 月 9 日)。
- 目标读者:任何对最先进的 LLM 引擎如何工作感到好奇的人,以及想给 vLLM、SGLang 等项目做贡献的人。
- 我聚焦在 V1 engine。我也研究过 V0 engine(现在已经被废弃),那对理解这个项目是怎么演化过来的很有价值,而且很多概念至今仍然通用。
- 第一节 LLM Engine / Engine Core 可能会有点信息过载、有点枯燥——但文章其余部分有大量例子和配图。 :)
LLM Engine & Engine Core
LLM Engine & Engine Core
The LLM engine is the fundamental building block of vLLM. On its own, it already enables high-throughput inference - but only in an offline setting. You can’t serve it to customers over the web yet.
LLM engine 是 vLLM 最基础的构件。它自己就已经能提供高吞吐推理——但只限于离线场景,你还不能把它部署到线上给客户用。
We’ll use the following offline inference snippet as our running example (adapted from basic.py).
下面这段离线推理代码会作为我们贯穿全篇的例子(改编自 basic.py)。
from vllm import LLM, SamplingParams

prompts = [
    "Hello, my name is",
    "The president of the United States is",
]

sampling_params = SamplingParams(temperature=0.8, top_p=0.95)

def main():
    llm = LLM(model="TinyLlama/TinyLlama-1.1B-Chat-v1.0")

    outputs = llm.generate(prompts, sampling_params)

if __name__ == "__main__":
    main()
说明
Environment vars:
- VLLM_USE_V1=“1” # we’re using engine V1
- VLLM_ENABLE_V1_MULTIPROCESSING=“0” # we’re running in a single process
说明
环境变量:
VLLM_USE_V1="1"—— 我们用的是 engine V1VLLM_ENABLE_V1_MULTIPROCESSING="0"—— 单进程运行
This configuration is:
这个配置的特点是:
- offline (no web/distributed system scaffolding)
- synchronous (all execution happens in a single blocking process)
- single-GPU (no data/model/pipeline/expert parallelism; DP/TP/PP/EP = 1)
- using standard transformer [2] (supporting hybrid models like Jamba requires a more complex hybrid KV-cache memory allocator)
- 离线(没有 Web / 分布式系统的外壳)
- 同步(所有执行都发生在一个阻塞进程里)
- 单卡(没有 data / model / pipeline / expert 并行;DP/TP/PP/EP 都等于 1)
- 跑的是标准 transformer [2](要支持 Jamba 这种 hybrid 模型,需要一套更复杂的 hybrid KV-cache 显存分配器)
From here, we’ll gradually build up to an online, async, multi-GPU, multi-node inference system - but still serving a standard transformer.
从这里开始,我们会一步步搭出一个在线的、异步的、多卡多机的推理系统——但服务的仍然是标准 transformer。
In this example we do two things, we:
在这个例子里我们做了两件事:
- Instantiate an engine
- Call
generateon it to sample from the given prompts
- 实例化一个 engine
- 调用它的
generate,从给定的 prompts 里采样
Let’s start analyzing the constructor.
下面先从构造函数开始分析。
LLM Engine constructor
LLM Engine constructor
The main components of the engine are:
engine 的主要组成部分有:
- vLLM config (contains all of the knobs for configuring model, cache, parallelism, etc.)
- processor (turns raw inputs →
EngineCoreRequestsvia validation, tokenization, and processing) - engine core client (in our running example we’re using
InprocClientwhich is basically ==EngineCore; we’ll gradually build up toDPLBAsyncMPClientwhich allows serving at scale) - output processor (converts raw
EngineCoreOutputs→RequestOutputthat the user sees)
- vLLM config(所有用来配置模型、cache、并行度等等的旋钮)
- processor(把原始输入经过校验、tokenization、处理,变成
EngineCoreRequests) - engine core client(在我们的例子里用的是
InprocClient,它基本就等于EngineCore;后面会逐步升级到能在规模化场景下服务的DPLBAsyncMPClient) - output processor(把原始的
EngineCoreOutputs转成用户看到的RequestOutput)
说明
With the V0 engine being deprecated, class names and details may shift. I’ll emphasize the core ideas rather than exact signatures. I’ll abstract away some but not all of those details.
说明
V0 engine 被废弃之后,类名和细节可能还会变。我会强调核心思路,而不是精确的签名;这些细节我会抽象掉一部分,但不是全部。
Engine core itself is made up of several sub components:
engine core 本身由几个子组件构成:
-
Model Executor (drives forward passes on the model, we’re currently dealing with
UniProcExecutorwhich has a singleWorkerprocess on a single GPU). We’ll gradually build up toMultiProcExecutorwhich supports multiple GPUs -
Structured Output Manager (used for guided decoding - we’ll cover this later)
-
Scheduler (decides which requests go into the next engine step) - it further contains:
- policy setting - it can be either FCFS (first come first served) or priority (higher priority requests are served first)
waitingandrunningqueues- KV cache manager - the heart of paged attention [3]
- Model Executor(驱动模型上的 forward pass;现在面对的是
UniProcExecutor,单卡上跑一个Worker进程。后面会升级到支持多卡的MultiProcExecutor) - Structured Output Manager(用于 guided decoding,后面会讲)
- Scheduler(决定哪些请求进入下一个 engine step),它内部还包含:
- policy 设置:可以是 FCFS(先到先服务),也可以是 priority(高优先级请求先服务)
waiting和running两个队列- KV cache manager —— paged attention 的心脏 [3]
The KV-cache manager maintains a free_block_queue - a pool of available KV-cache blocks (often on the order of hundreds of thousands, depending on VRAM size and block size). During paged attention, the blocks serve as the indexing structure that map tokens to their computed KV cache blocks.
KV-cache manager 维护着一个 free_block_queue:一个可用 KV-cache block 的池子(通常是几十万这个量级,取决于显存大小和 block size)。在 paged attention 里,这些 block 就是那张把 token 映射到它已算好的 KV cache block 的索引结构。
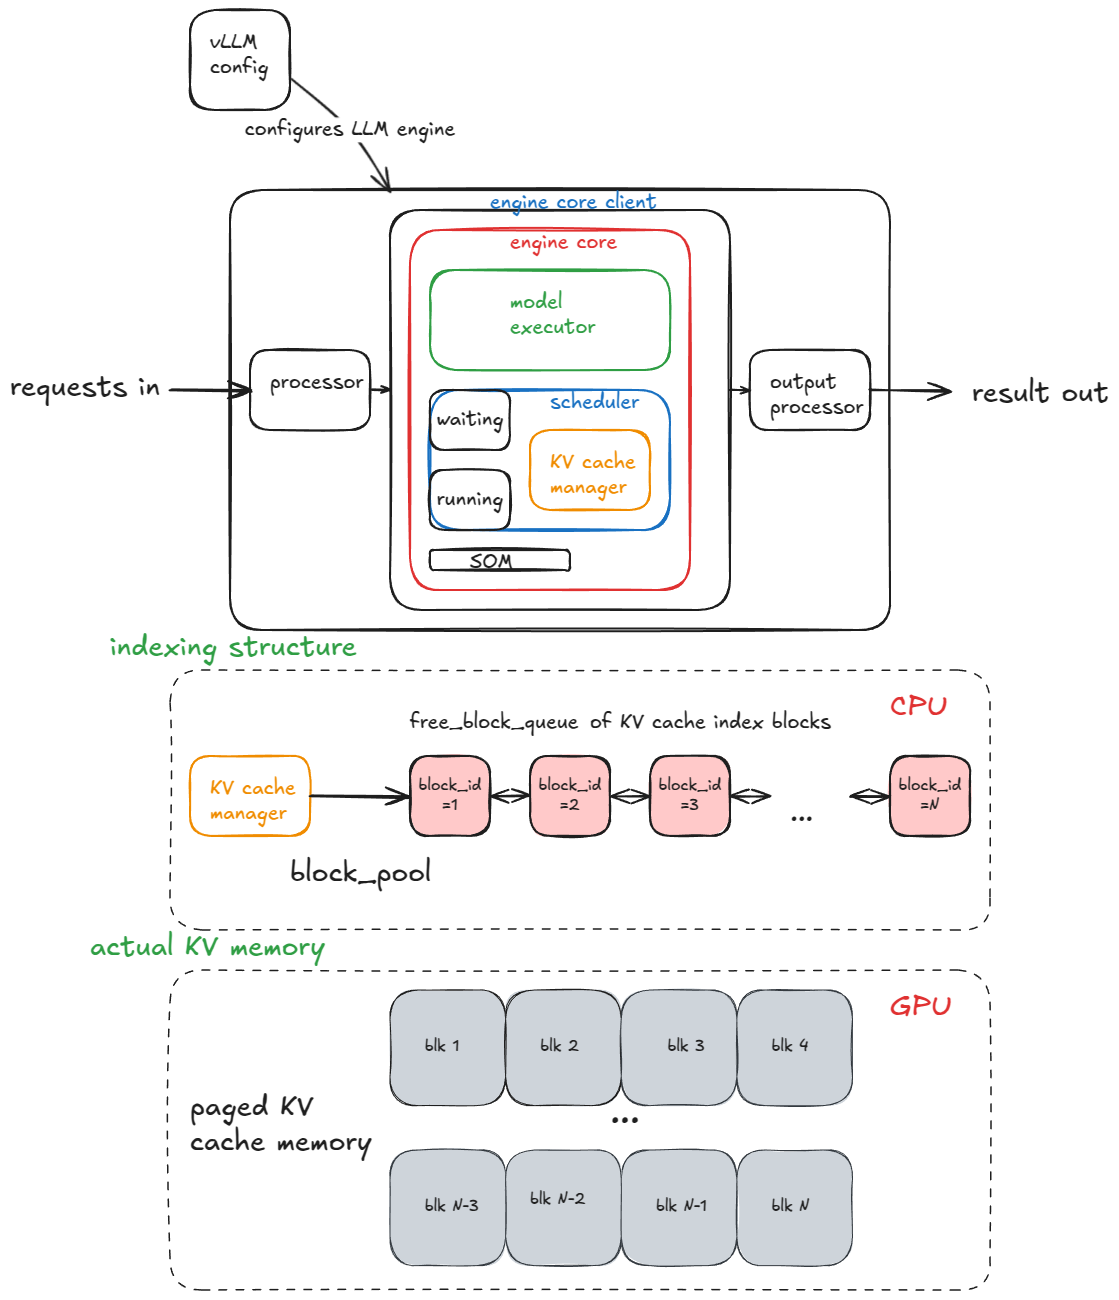
Figure 1: Core components described in this section and their relationships
说明
Block size for a standard transformer layer (non-MLA [4]) is computed as follows: 2 (key/value) *
block_size(default=16) *num_kv_heads*head_size*dtype_num_bytes(e.g. 2 for bf16)
说明
标准 transformer 层(非 MLA [4])的 block size 是这样算出来的: 2(key/value)×
block_size(默认 16)×num_kv_heads×head_size×dtype_num_bytes(比如 bf16 就是 2)
During model executor construction, a Worker object is created, and three key procedures are executed. (Later, with MultiProcExecutor, these same procedures run independently on each worker process across different GPUs.)
在构造 model executor 的过程中,会创建一个 Worker 对象,并执行三个关键流程。(后面换成 MultiProcExecutor 之后,同样的流程会在不同 GPU 上的每个 worker 进程里各自独立执行一遍。)
- Init device:
- Init device:
- Assign a CUDA device (e.g. “cuda”) to the worker and check that the model dtype is supported (e.g. bf16)
- Verify enough VRAM is available, given the requested
gpu_memory_utilization(e.g. 0.8 → 80% of total VRAM) - Set up distributed settings (DP / TP / PP / EP, etc.)
- Instantiate a
model_runner(holds the sampler, KV cache, and forward-pass buffers such asinput_ids,positions, etc.) - Instantiate an
InputBatchobject (holds CPU-side forward-pass buffers, block tables for KV-cache indexing, sampling metadata, etc.)
- 给 worker 分配一个 CUDA device(比如 “cuda”),并检查模型 dtype 是否被支持(比如 bf16)
- 在给定的
gpu_memory_utilization(比如 0.8,即总显存的 80%)下,确认显存够用 - 设置分布式配置(DP / TP / PP / EP 等)
- 实例化一个
model_runner(持有 sampler、KV cache,以及input_ids、positions这类 forward-pass buffer) - 实例化一个
InputBatch对象(持有 CPU 侧的 forward-pass buffer、用于 KV-cache 索引的 block table、sampling metadata 等)
- Load model:
- Load model:
- Instantiate the model architecture
- Load the model weights
- Call model.eval() (PyTorch’s inference mode)
- Optional: call torch.compile() on the model
- 实例化模型结构
- 加载模型权重
- 调用
model.eval()(PyTorch 的推理模式) - 可选:对模型调用
torch.compile()
- Initialize KV cache
- Initialize KV cache:
- Get per-layer KV-cache spec. Historically this was always
FullAttentionSpec(homogeneous transformer), but with hybrid models (sliding window, Transformer/SSM like Jamba) it became more complex (see Jenga [5]) - Run a dummy/profiling forward pass and take a GPU memory snapshot to compute how many KV cache blocks fit in available VRAM
- Allocate, reshape and bind KV cache tensors to attention layers
- Prepare attention metadata (e.g. set the backend to FlashAttention) later consumed by kernels during the fwd pass
- Unless
–enforce-eageris provided, for each of warmup batch sizes do a dummy run and capture CUDA graphs. CUDA graphs record the whole sequence of GPU work into a DAG. Later during fwd pass we launch/replay pre-baked graphs and cut on kernel launch overhead and thus improve latency.
- 取得每一层的 KV-cache spec。历史上这里永远是
FullAttentionSpec(同质 transformer),但在 hybrid 模型(sliding window、Jamba 这类 Transformer/SSM 混合)出现之后,事情变复杂了(见 Jenga [5]) - 跑一次 dummy / profiling forward pass,并抓取一次 GPU 显存快照,算出可用显存能装下多少个 KV cache block
- 分配、reshape,并把 KV cache tensor 绑定到 attention 层上
- 准备 attention metadata(比如把后端设成 FlashAttention),供 forward pass 里的 kernel 之后使用
- 除非传了
--enforce-eager,否则对每个 warmup batch size 都跑一次 dummy run 并捕获 CUDA graph。CUDA graph 把整串 GPU 工作记录成一张 DAG;之后 forward pass 时直接启动/回放预先编好的 graph,省掉 kernel launch 的开销,从而降低延迟。
I’ve abstracted away many low-level details here — but these are the core pieces I’ll introduce now, since I’ll reference them repeatedly in the following sections.
这里我抽象掉了很多底层细节——但这些是接下来会反复引用的核心部件,所以先介绍一遍。
Now that we have the engine initialized let’s proceed to the generate function.
engine 初始化完成,接下来看 generate 函数。
Generate function
Generate function
The first step is to validate and feed requests into the engine. For each prompt we:
第一步是校验请求并把它喂进 engine。对每个 prompt 我们:
- Create a unique request ID and capture its arrival time
- Call an input preprocessor that tokenizes the prompt and returns a dictionary containing
prompt,prompt_token_ids, and atype(text, tokens, embeds, etc.) - Pack this info into an
EngineCoreRequest, adding priority, sampling params, and other metadata - Pass the request into the engine core, which wraps it in a
Requestobject and sets its status toWAITING. This request is then added to the scheduler’swaitingqueue (append if FCFS, or heap-push if priority)
- 生成一个唯一的 request ID,并记录它的到达时间
- 调用 input preprocessor 对 prompt 做 tokenization,返回一个包含
prompt、prompt_token_ids和type(text、tokens、embeds 等)的字典 - 把这些信息打包成一个
EngineCoreRequest,补上 priority、sampling params 和其他 metadata - 把请求送进 engine core,engine core 把它包成一个
Request对象,状态置为WAITING,然后加到 scheduler 的waiting队列(FCFS 就 append,priority 就 heap-push)
At this point the engine has been fed and execution can begin. In the synchronous engine example, these initial prompts are the only ones we’ll process — there’s no mechanism to inject new requests mid-run. In contrast, the asynchronous engine supports this (aka continuous batching [6]): after each step, both new and old requests are considered.
到这里 engine 已经喂饱了,可以开始执行。在同步 engine 的例子里,这批初始 prompt 就是我们会处理的全部——没有任何机制能在运行中途注入新请求。相比之下,异步 engine 支持这一点(也就是 continuous batching [6]):每个 step 之后,新老请求都会被一起考虑。
说明
Because the forward pass flattens the batch into a single sequence and custom kernels handle it efficiently, continuous batching is fundamentally supported even in the synchronous engine.
说明
因为 forward pass 会把整个 batch 摊平成一条序列、由自定义 kernel 高效处理,所以即使在同步 engine 里,continuous batching 在底层也是被支持的。
Next, as long as there are requests to process, the engine repeatedly calls its step() function. Each step has three stages:
接下来,只要还有请求要处理,engine 就会反复调用它的 step() 函数。每个 step 有三个阶段:
- Schedule: select which requests to run in this step (decode, and/or (chunked) prefill)
- Forward pass: run the model and sample tokens
- Postprocess: append sampled token IDs to each
Request, detokenize, and check stop conditions. If a request is finished, clean up (e.g. return its KV-cache blocks tofree_block_queue) and return the output early
- Schedule:选出这一步要跑哪些请求(decode,和/或(chunked)prefill)
- Forward pass:跑模型并采样 token
- Postprocess:把采样出的 token ID 追加到每个
Request上,detokenize,检查停止条件。如果某个请求结束了,就做清理(比如把它的 KV-cache block 还给free_block_queue)并提前返回输出
说明
Stop conditions are:
- The request exceeds its length limit (
max_model_lengthor its ownmax_tokens)- The sampled token is the EOS ID (unless
ignore_eosis enabled -> useful for benchmarking when we want to force a generation of a certain number of out tokens)- The sampled token matches any of the
stop_token_idsspecified in the sampling parameters- Stop strings are present in the output - we truncate the output until the first stop string appearance and abort the request in the engine (note that
stop_token_idswill be present in the output but stop strings will not).
说明
停止条件是:
- 请求超过了长度上限(
max_model_length,或它自己的max_tokens)- 采样出的 token 是 EOS ID(除非开了
ignore_eos—— 这在 benchmark 里想强制生成固定数量的 output token 时很有用)- 采样出的 token 命中了 sampling params 里指定的任何一个
stop_token_ids- 输出里出现了 stop string —— 我们会在第一个 stop string 出现的位置截断输出,并在 engine 里中止这个请求(注意:
stop_token_ids会保留在输出里,stop string 不会)
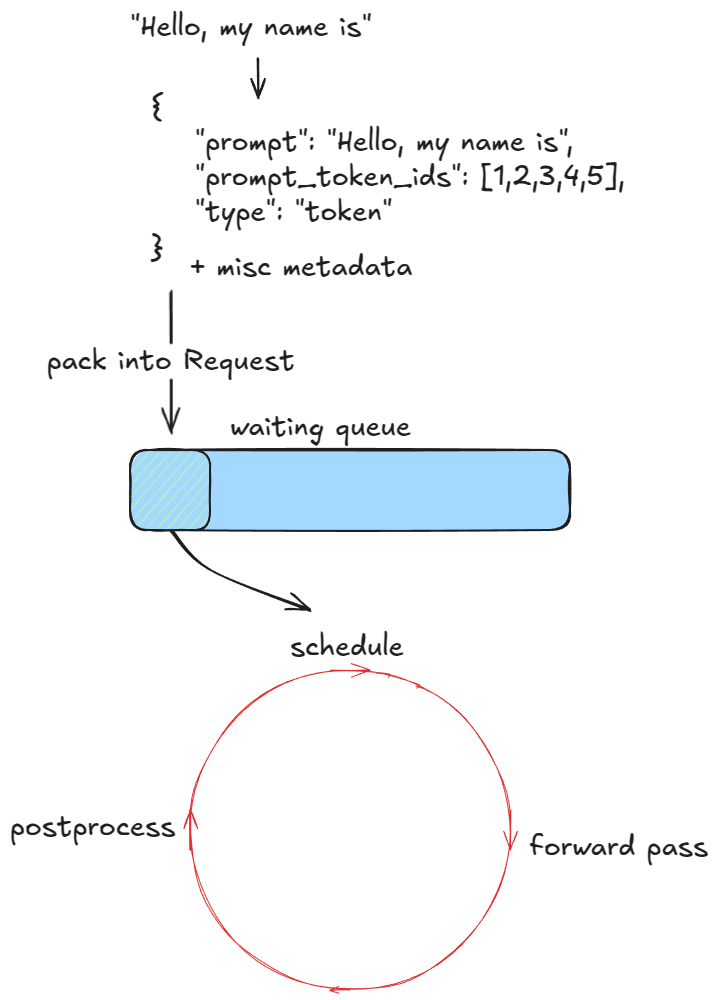
Figure 2: Engine loop
说明
In streaming mode, we would send intermediate tokens as they are generated, but we’ll ignore that for now.
说明
在 streaming 模式下,我们会边生成边把中间 token 发出去,这里先忽略这一点。
Next, we’ll examine scheduling in more detail.
下面更仔细地看调度。
Scheduler
Scheduler
There are two main types of workloads an inference engine handles:
推理引擎处理的工作负载主要有两类:
- Prefill requests — a forward pass over all prompt tokens. These are usually compute-bound (threshold depends on hardware and prompt length). At the end, we sample a single token from the probability distribution of the final token’s position.
- Decode requests — a forward pass over just the most recent token. All earlier KV vectors are already cached. These are memory-bandwidth-bound, since we still need to load all LLM weights (and KV caches) just to compute one token.
- Prefill 请求 —— 对所有 prompt token 做一次 forward pass。这类通常是 compute-bound(具体阈值取决于硬件和 prompt 长度)。最后,我们从最后一个位置的概率分布里采样出一个 token。
- Decode 请求 —— 只对最近的一个 token 做 forward pass,之前所有位置的 KV 向量都已经缓存好了。这类是 memory-bandwidth-bound,因为为了算出一个 token,我们仍然要把全部 LLM 权重(以及 KV cache)读进来一遍。
说明
In the benchmarking section we’ll analyze the so-called roofline model of GPU perf. That will go into more detail behind prefill/decode perf profiles.
说明
在 benchmark 那一节里,我们会分析 GPU 性能的所谓 roofline model,那里会展开讲 prefill / decode 这两种性能画像背后的原因。
The V1 scheduler can mix both types of requests in the same step, thanks to smarter design choices. In contrast, the V0 engine could only process either prefill or decode at once.
得益于更聪明的设计,V1 scheduler 可以在同一个 step 里混合这两类请求。相比之下,V0 engine 一次只能处理 prefill 或 decode 中的一种。
The scheduler prioritizes decode requests — i.e. those already in the running queue. For each such request it:
scheduler 会优先处理 decode 请求,也就是已经在 running 队列里的那些。对每个这样的请求,它:
- Computes the number of new tokens to generate (not always 1, due to speculative decoding and async scheduling — more on that later).
- Calls the KV-cache manager’s
allocate_slotsfunction (details below). - Updates the token budget by subtracting the number of tokens from step 1.
- 算出这一步要生成多少个新 token(不总是 1,因为有 speculative decoding 和 async scheduling——后面细讲)
- 调用 KV-cache manager 的
allocate_slots函数(细节见下) - 从 token budget 里减去第 1 步算出的 token 数
After that, it processes prefill requests from the waiting queue, it:
之后,它再处理 waiting 队列里的 prefill 请求,对每个请求:
- Retrieves the number of computed blocks (returns 0 if prefix caching is disabled — we’ll cover that later).
- Calls the KV-cache manager’s
allocate_slotsfunction. - Pops the request from waiting and moves it to running, setting its status to
RUNNING. - Updates the token budget.
- 取出已计算的 block 数量(如果关了 prefix caching 就返回 0——后面会讲)
- 调用 KV-cache manager 的
allocate_slots函数 - 把请求从 waiting 弹出、移入 running,状态置为
RUNNING - 更新 token budget
Let’s now look at what allocate_slots does, it:
现在来看看 allocate_slots 做了什么:
- Computes number of blocks — determines how many new KV-cache blocks (
n) must be allocated. Each block stores 16 tokens by default. For example, if a prefill request has 17 new tokens, we needceil(17/16) = 2blocks. - Checks availability — if there aren’t enough blocks in the manager’s pool, exit early. Depending on whether it’s a decode or prefill request, the engine may attempt recompute preemption (swap preemption was supported in V0) by evicting low-priority requests (calling
kv_cache_manager.freewhich returns KV blocks to block pool), or it might skip scheduling and continue execution. - Allocates blocks — via the KV-cache manager’s coordinator, fetches the first
nblocks from the block pool (thefree_block_queuedoubly linked list mentioned earlier). Stores toreq_to_blocks, the dictionary mapping eachrequest_idto its list of KV-cache blocks.
- 计算 block 数量 —— 决定需要新分配多少个 KV-cache block(
n)。每个 block 默认存 16 个 token。比如一个 prefill 请求有 17 个新 token,就需要ceil(17/16) = 2个 block。 - 检查可用性 —— 如果 manager 的池子里没有足够的 block,就提前退出。根据请求是 decode 还是 prefill,engine 可能会尝试 recompute preemption(V0 里还支持 swap preemption),也就是驱逐低优先级的请求(调用
kv_cache_manager.free把 KV block 还回 block pool),或者干脆跳过这次调度、继续执行。 - 分配 block —— 通过 KV-cache manager 的 coordinator,从 block pool(前面提到的
free_block_queue双向链表)里取出前n个 block,存进req_to_blocks,也就是那张把每个request_id映射到它的 KV-cache block 列表的字典。
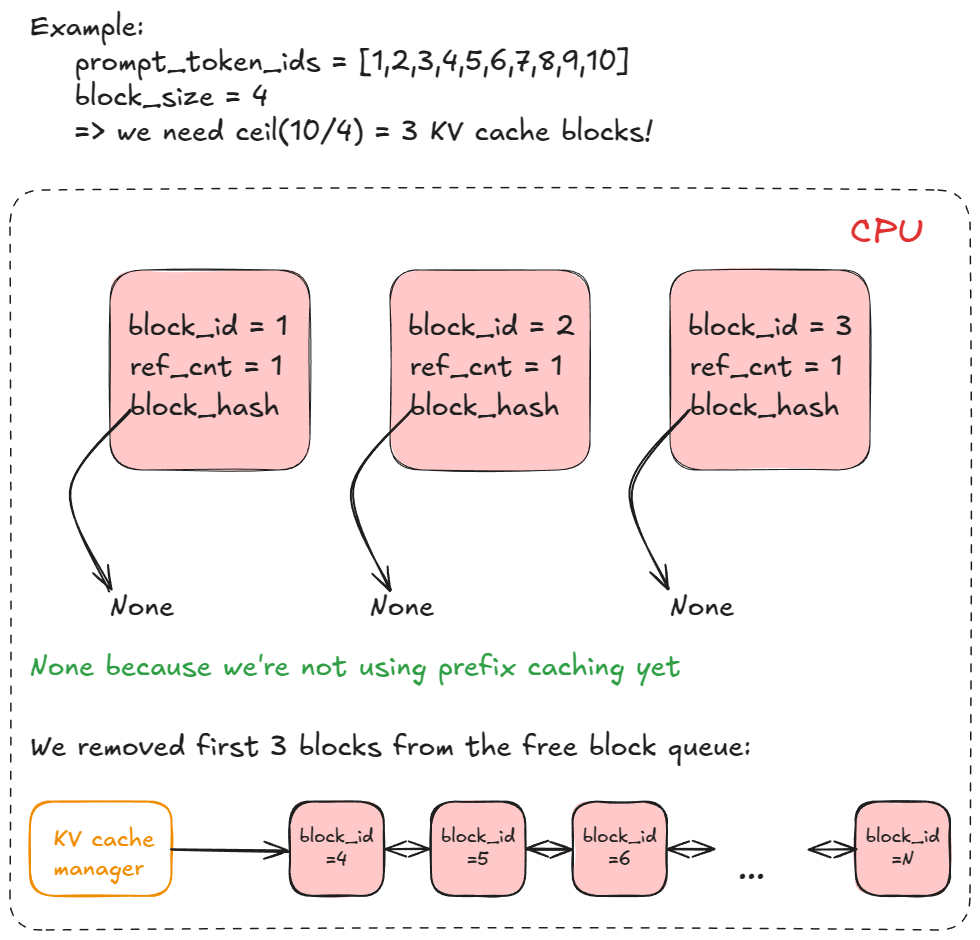
Figure 3: list of KV cache blocks
We’re finally ready to do a forward pass!
终于可以跑 forward pass 了!
Run forward pass
Run forward pass
We call model executor’s execute_model, which delegates to the Worker, which in turn delegates to the model runner.
我们调用 model executor 的 execute_model,它交给 Worker,Worker 再交给 model runner。
Here are the main steps:
主要步骤如下:
- Update states — prune finished requests from
input_batch; update misc fwd pass related metadata (e.g., KV cache blocks per request that will be used to index into paged KV cache memory). - Prepare inputs — copy buffers from CPU→GPU; compute positions; build
slot_mapping(more on that in example); construct attention metadata. - Forward pass — run the model with custom paged attn kernels. All sequences are flattened and concatenated into one long “super sequence”. Position indices and attention masks ensure each sequence only attends to its own tokens, which enables continuous batching without right-padding.
- Gather last-token states — extract hidden states for each sequence’s final position and compute logits.
- Sample — sample tokens from computed logits as dictated by the sampling config (greedy, temperature, top-p, top-k, etc.).
- 更新状态 —— 把已完成的请求从
input_batch里剔除;更新 forward pass 相关的杂项 metadata(比如每个请求的 KV cache block,之后会用来索引 paged KV cache 显存)。 - 准备输入 —— 把 buffer 从 CPU 拷到 GPU;计算 positions;构造
slot_mapping(例子里有详细说明);构造 attention metadata。 - Forward pass —— 用自定义的 paged attn kernel 跑模型。所有序列会被摊平、拼接成一条很长的 “super sequence”。position index 和 attention mask 保证每条序列只看自己的 token,这样就实现了不需要 right-padding 的 continuous batching。
- 收集末位 token 的 hidden state —— 取出每条序列最后一个位置的 hidden state,算出 logits。
- 采样 —— 按 sampling config(greedy、temperature、top-p、top-k 等)从算出的 logits 里采样 token。
Forward-pass step itself has two execution modes:
forward pass 本身有两种执行模式:
- Eager mode — run the standard PyTorch forward pass when eager execution is enabled.
- “Captured” mode — execute/replay a pre-captured CUDA Graph when eager is not enforced (remember we captured these during engine construction in the initialize KV cache procedure).
- Eager 模式 —— 开启 eager execution 时,跑标准的 PyTorch forward pass。
- “Captured” 模式 —— 没有强制 eager 时,执行/回放预先捕获好的 CUDA Graph(回忆一下,这些图是在 engine 构造的 initialize KV cache 流程里捕获的)。
Here is a concrete example that should make continuous batching and paged attention clear:
下面这个具体例子应该能把 continuous batching 和 paged attention 讲清楚:
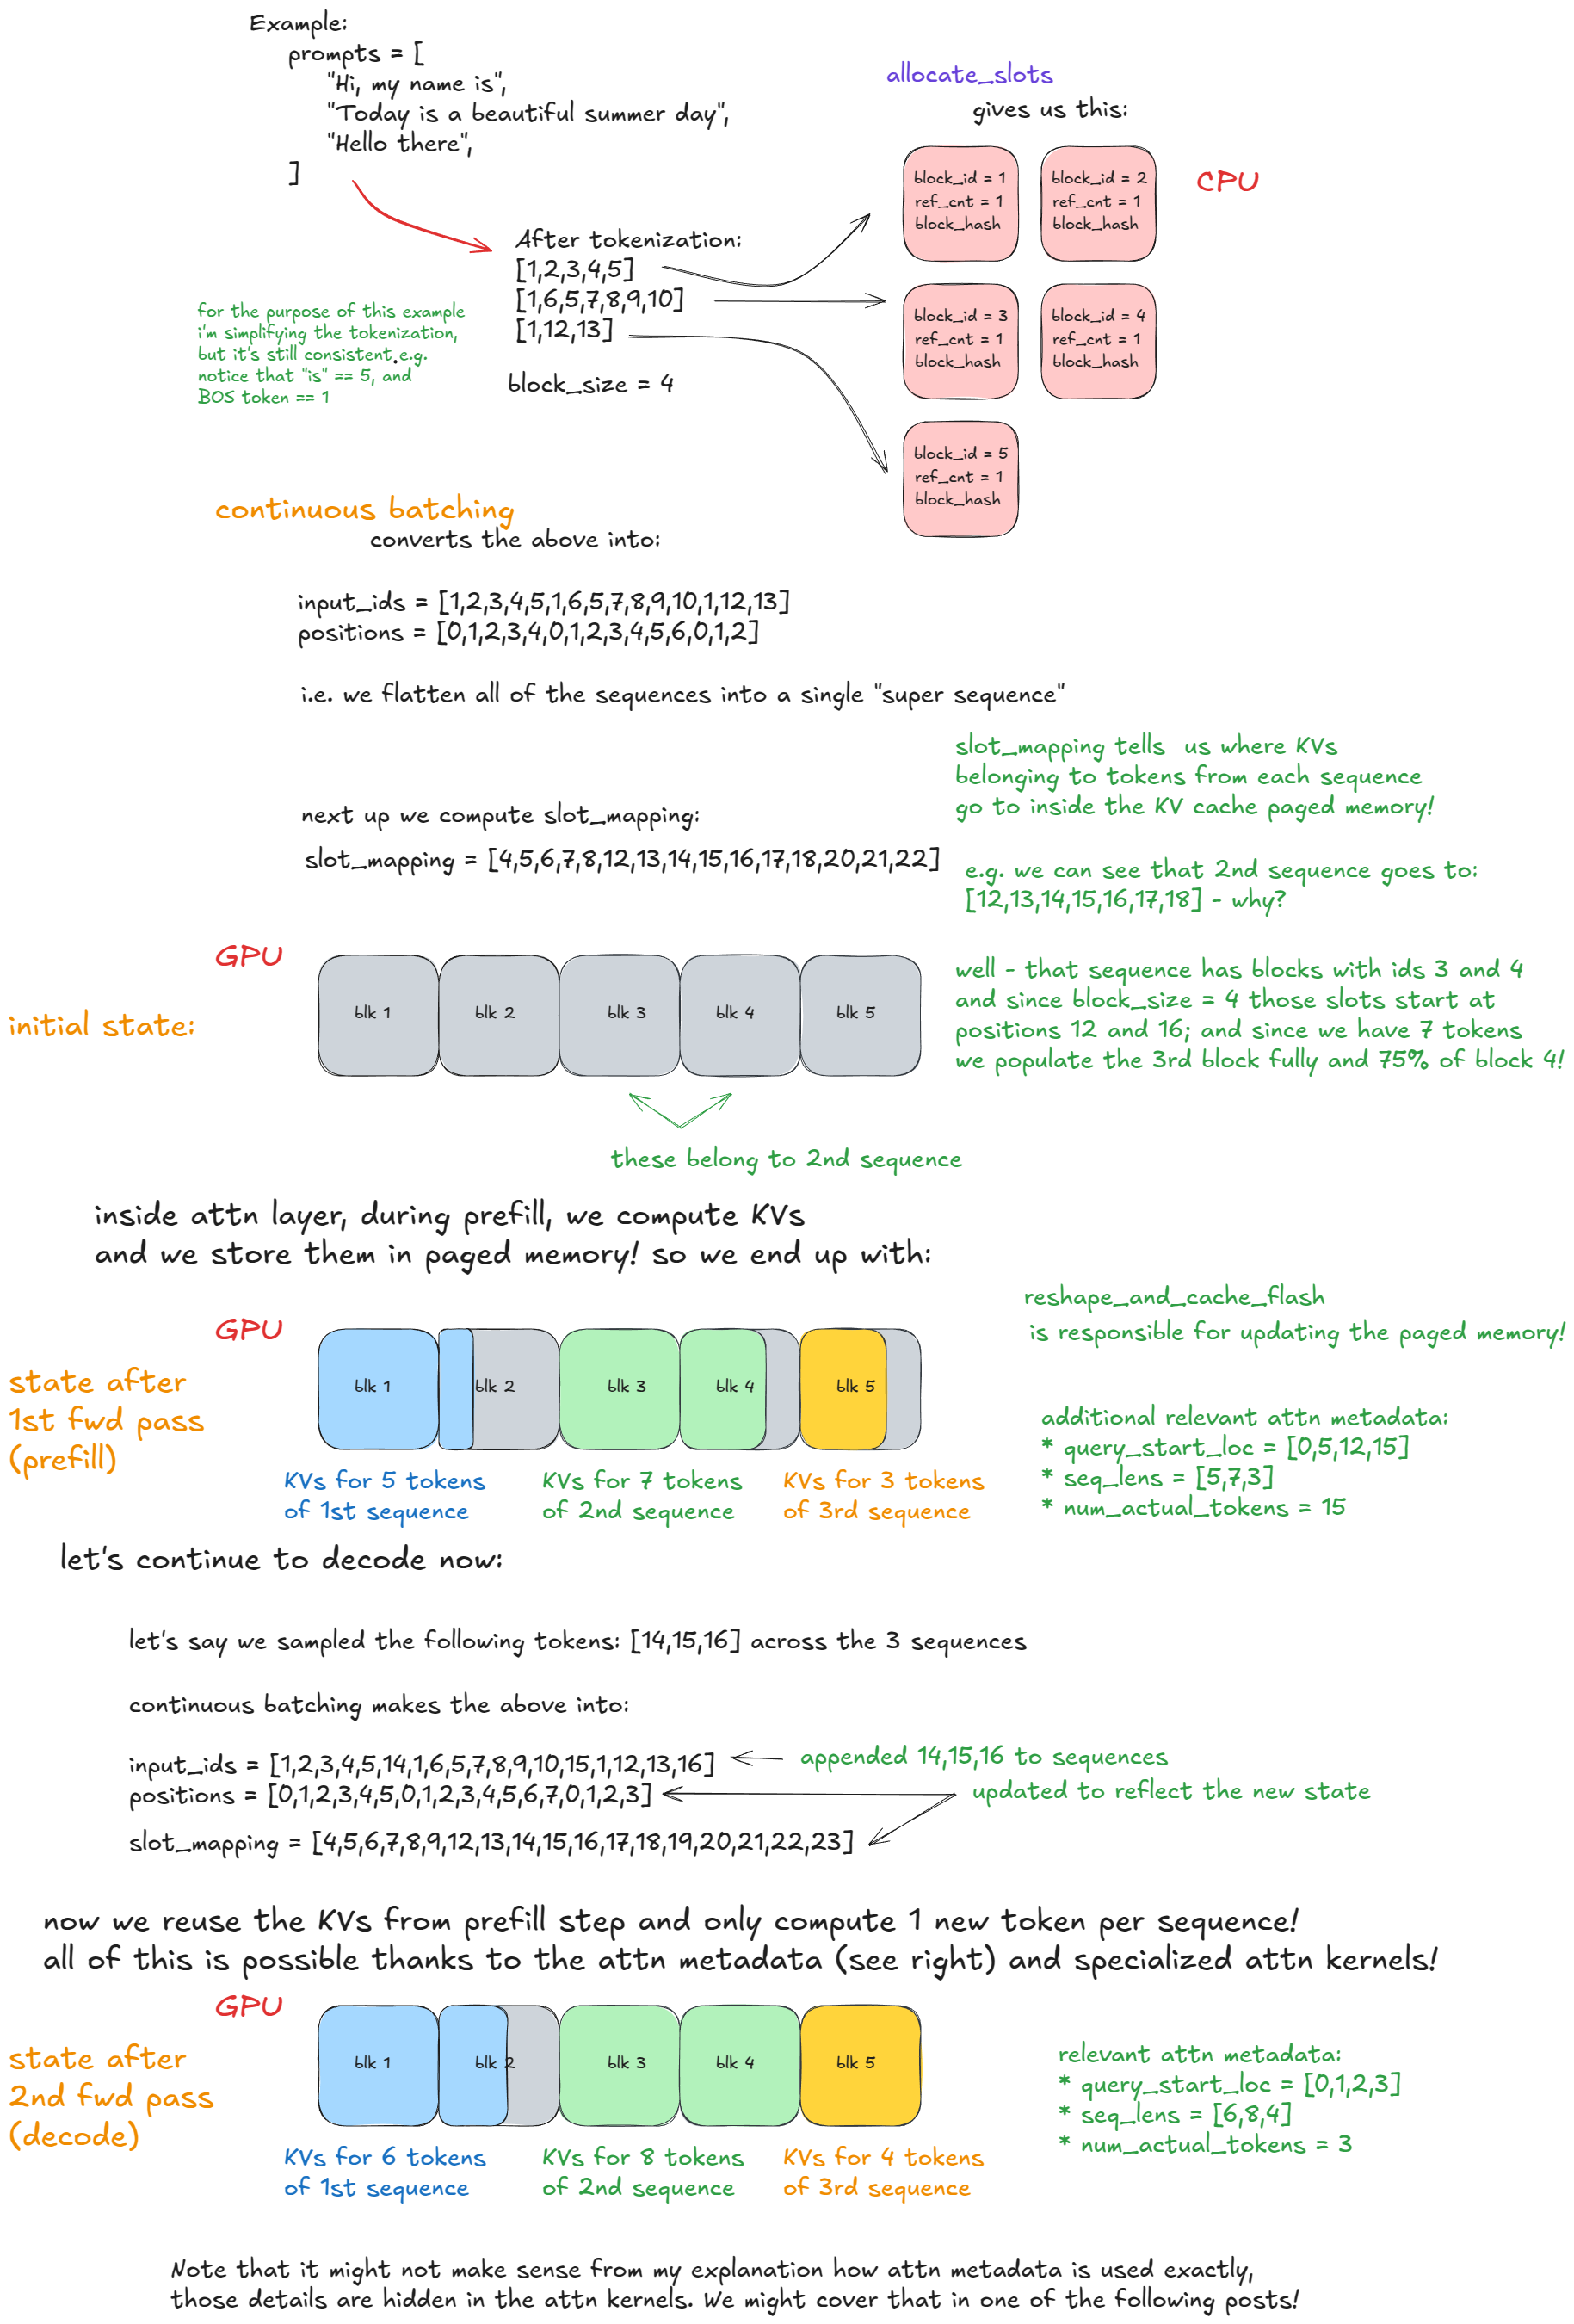
Figure 4: Forward pass: continuous batching and paged attention
本文是系列第 1 篇。下一篇:高级特性(上)—— chunked prefill、prefix caching 与 guided decoding。
注释
- vLLM —— https://github.com/vllm-project/vllm
- “Attention Is All You Need” —— https://arxiv.org/abs/1706.03762
- “Efficient Memory Management for Large Language Model Serving with PagedAttention” —— https://arxiv.org/abs/2309.06180
- “DeepSeek-V2: A Strong, Economical, and Efficient Mixture-of-Experts Language Model” —— https://arxiv.org/abs/2405.04434
- “Jenga: Effective Memory Management for Serving LLM with Heterogeneity” —— https://arxiv.org/abs/2503.18292
- “Orca: A Distributed Serving System for Transformer-Based Generative Models” —— https://www.usenix.org/conference/osdi22/presentation/yu
讨论
这里是静态站点,没有内嵌评论区。如果这篇文章对你有用,欢迎通过 RSS 订阅后续更新。