走进 vLLM(三):speculative decoding 与 disaggregated P/D
一次大模型 forward 最多换回 k+1 个 token,而且分布和逐个采样完全等价——speculative decoding 是怎么做到的?vLLM V1 为什么不用小模型做 draft,而用 n-gram / EAGLE / Medusa?以及为什么 prefill 和 decode 值得被拆到两批实例上跑。
本篇属于系列 走进 vLLM:高吞吐 LLM 推理系统解剖 · 第 3 篇
原文:Inside vLLM: Anatomy of a High-Throughput LLM Inference System,作者 Aleksa Gordic,2025-09-05 发布于 vLLM 官方博客。
本文是系列《走进 vLLM:高吞吐 LLM 推理系统解剖》的第 3 篇,共 5 篇。承接第 2 篇(chunked prefill、prefix caching 与 guided decoding)。
本站中英对照排版:左栏英文原文,右栏中文译文;不好翻译的术语保留英文写法。
Speculative Decoding
Speculative Decoding
In autoregressive generation, each new token requires a forward pass of the large LM. This is expensive — every step reloads and applies all model weights just to compute a single token! (assuming batch size == 1, in general it’s B)
在自回归生成里,每产出一个新 token 都需要大模型做一次 forward pass。这很贵——每一步都要把全部模型权重重新读一遍、算一遍,只为了算出一个 token!(这里假设 batch size == 1,一般来说是 B。)
Speculative decoding [8] speeds this up by introducing a smaller draft LM. The draft proposes k tokens cheaply. But we don’t ultimately want to sample from the smaller model — it’s only there to guess candidate continuations. The large model still decides what’s valid.
Speculative decoding [8] 用一个更小的 draft LM 来加速:draft 模型廉价地提出 k 个 token。但我们最终并不想从这个小模型采样——它只是用来猜候选续写的。哪些是有效的,仍然由大模型说了算。
Here are the steps:
步骤如下:
- Draft: run the small model on the current context and propose
ktokens - Verify: run the large model once on context +
kdraft tokens. This produces probabilities for thosekpositions plus one extra (so we getk+1candidates) - Accept/reject: going from left to right over the
kdraft tokens:
- Draft:在当前 context 上跑小模型,提出
k个 token - Verify:把 context +
k个 draft token 一起喂给大模型跑一次。这会给出这k个位置的(以及额外一个位置的)概率(于是我们拿到了k+1个候选) - Accept/reject:对这
k个 draft token 从左到右逐个判断:
- If the large model's probability for the draft token ≥ the draft's probability, accept it
- Otherwise, accept it with probability
p_large(token)/p_draft(token) - Stop at the first rejection, or accept all
kdraft tokens - If all
kdraft tokens are accepted, also sample the extra(k+1)-th token "for free" from the large model (we already computed that distribution) - If there was a rejection create a new rebalanced distribution at that position (
p_large - p_draft, clamp min at 0, normalize to sum to 1) and sample the last token from it
- 如果大模型给出该 draft token 的概率 ≥ draft 模型的概率,接受它
- 否则以
p_large(token)/p_draft(token)的概率接受它 - 遇到第一次拒绝就停下,或者接受全部
k个 draft token- 如果
k个 draft token 全被接受,就顺便从大模型里“免费”采样出多出来的第(k+1)个 token(那个分布我们已经算好了) - 如果中途被拒,就在那个位置上构造一个新的、重新平衡过的分布(
p_large - p_draft,下界截到 0,再归一化到和为 1),从它里面采样出最后一个 token
- 如果
Why this works: Although we use the small model to propose candidates, the accept/reject rule guarantees that in expectation the sequence is distributed exactly as if we had sampled token by token from the large model. This means speculative decoding is statistically equivalent to standard autoregressive decoding — but potentially much faster, since a single large-model pass can yield up to k+1 tokens.
为什么这是对的:虽然我们是用小模型来提候选,但这条接受/拒绝规则保证了:期望上,序列的分布和逐个从大模型采样出来的分布完全一致。也就是说,speculative decoding 在统计上等价于标准的自回归解码——但可能快得多,因为一次大模型 forward 最多能换来 k+1 个 token。
说明
I recommend looking at gpt-fast for a simple implementation, and the original paper for the math details and the proof of equivalence to sampling from the full model.
vLLM V1 does not support the LLM draft model method, instead it implements faster—but less accurate—proposal schemes: n-gram, EAGLE [9], and Medusa [10].
vLLM V1 不支持用 LLM 做 draft model 的方案,而是实现了更快、但精度略低的候选方案:n-gram、EAGLE [9] 和 Medusa [10]。
One-liners on each:
各用一句话说清:
- n-gram: take the last
prompt_lookup_maxtokens; find a prior match in the sequence; if found, propose thektokens that followed that match; otherwise decrement the window and retry down toprompt_lookup_min
- n-gram:取最后
prompt_lookup_max个 token,在序列里找一次历史匹配;找到了就提议匹配之后跟随的k个 token;没找到就缩小窗口重试,一直降到prompt_lookup_min
说明
The current implementation returns
ktokens after the first match. It feels more natural to introduce a recency bias and reverse the search direction? (i.e. last match)
说明
当前实现返回第一次匹配之后的
k个 token。引入一点 recency bias、把搜索方向反过来(也就是取最后一次匹配)是不是更自然?
- Eagle: perform “model surgery” on the large LM—keep embeddings and LM head, replace the transformer stack with a lightweight MLP; fine-tune that as a cheap draft
- Eagle:对大 LM 做“模型手术”——保留 embedding 和 LM head,把 transformer 堆栈换成一个轻量 MLP,再微调它作为廉价的 draft
- Medusa: train auxiliary linear heads on top (embeddings before LM head) of the large model to predict the next
ktokens in parallel; use these heads to propose tokens more efficiently than running a separate small LM
- Medusa:在大模型之上(LM head 之前的 embedding 处)训练若干辅助线性头,并行预测接下来
k个 token;用这些头来提 token,比单独跑一个小 LM 更高效
Here’s how to invoke speculative decoding in vLLM using ngram as the draft method:
这是用 ngram 作为 draft method 在 vLLM 里调用 speculative decoding 的方式:
from vllm import LLM, SamplingParams

prompts = [
    "Hello, my name is",
    "The president of the United States is",
]

sampling_params = SamplingParams(temperature=0.8, top_p=0.95)

speculative_config={
    "method": "ngram",
    "prompt_lookup_max": 5,
    "prompt_lookup_min": 3,
    "num_speculative_tokens": 3,
}

def main():
    llm = LLM(model="TinyLlama/TinyLlama-1.1B-Chat-v1.0", speculative_config=speculative_config)

    outputs = llm.generate(prompts, sampling_params)

if __name__ == "__main__":
    main()
How does this work in vLLM?
在 vLLM 里这是怎么实现的?
Setup (during engine construction):
Setup(engine 构造期间):
- Init device: create a
drafter(draft model, e.g.,NgramProposer) and arejection_sampler(parts of it are written in Triton). - Load model: load draft model weights (no-op for n-gram).
- Init device:创建一个
drafter(draft 模型,比如NgramProposer)和一个rejection_sampler(它的一部分是用 Triton 写的)。 - Load model:加载 draft 模型权重(对 n-gram 来说是空操作)。
After that in the generate function (assume we get a brand new request):
之后在 generate 函数里(假设来的是一个全新请求):
- Run the regular prefill step with the large model.
- After the forward pass and standard sampling, call
propose_draft_token_ids(k)to samplekdraft tokens from the draft model. - Store these in
request.spec_token_ids(update the request metadata). - On the next engine step, when the request is in the running queue, add
len(request.spec_token_ids)to the “new tokens” count soallocate_slotsreserves sufficient KV blocks for the fwd pass. - Copy
spec_token_idsintoinput_batch.token_ids_cputo form (context + draft) tokens. - Compute metadata via
_calc_spec_decode_metadata(this copies over tokens frominput_batch.token_ids_cpu, prepares logits, etc.), then run a large-model forward pass over the draft tokens. - Instead of regular sampling from logits, use the
rejection_samplerto accept/reject left-to-right and produceoutput_token_ids. - Repeat steps 2-7 until a stop condition is met.
- 用大模型跑一次常规的 prefill step。
- forward pass 和标准采样之后,调用
propose_draft_token_ids(k),从 draft 模型采样出k个 draft token。 - 把它们存进
request.spec_token_ids(更新请求 metadata)。 - 下一个 engine step,当这个请求在 running 队列里时,把
len(request.spec_token_ids)加到“新 token”计数上,这样allocate_slots就会为 forward pass 预留足够的 KV block。 - 把
spec_token_ids拷进input_batch.token_ids_cpu,拼成(context + draft)token。 - 通过
_calc_spec_decode_metadata计算 metadata(它会从input_batch.token_ids_cpu拷贝 token、准备 logits 等),然后对这批 draft token 跑一次大模型的 forward pass。 - 不再从 logits 做常规采样,而是用
rejection_sampler从左到右接受/拒绝,产出output_token_ids。 - 重复步骤 2–7,直到满足某个停止条件。
The best way to internalize this is to fire up your debugger and step through the codebase, but this section hopefully gives you a taste for it. This as well:
把这一切内化的最好方式是打开 debugger、在代码库里一步步走。但希望这一节已经让你尝到味道了。下面这张图也能帮忙:
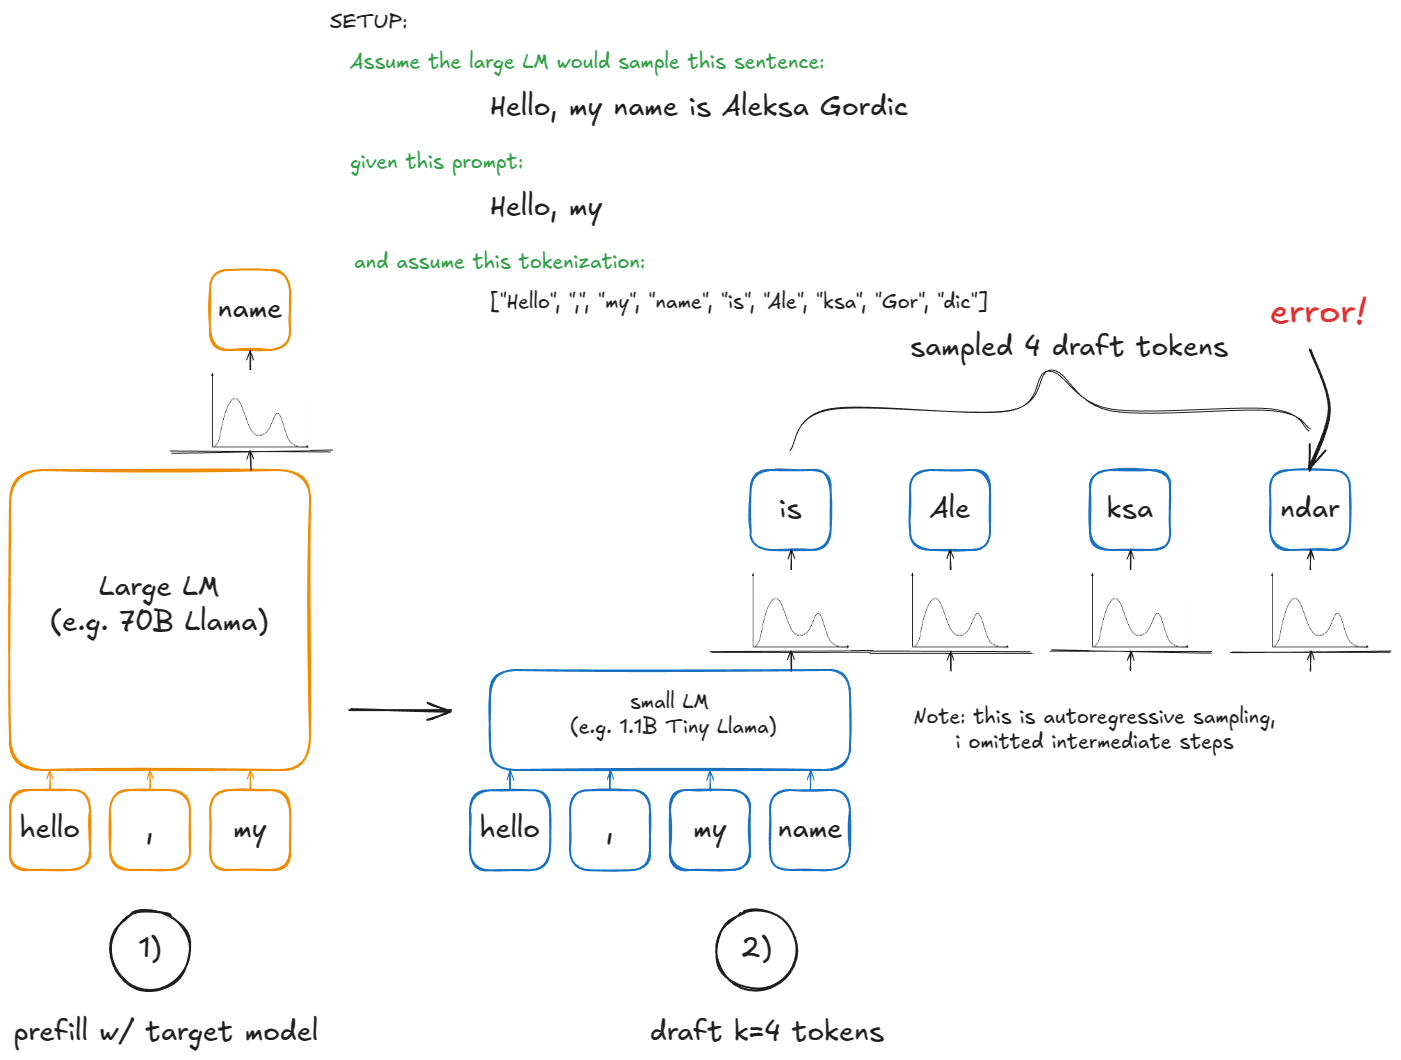
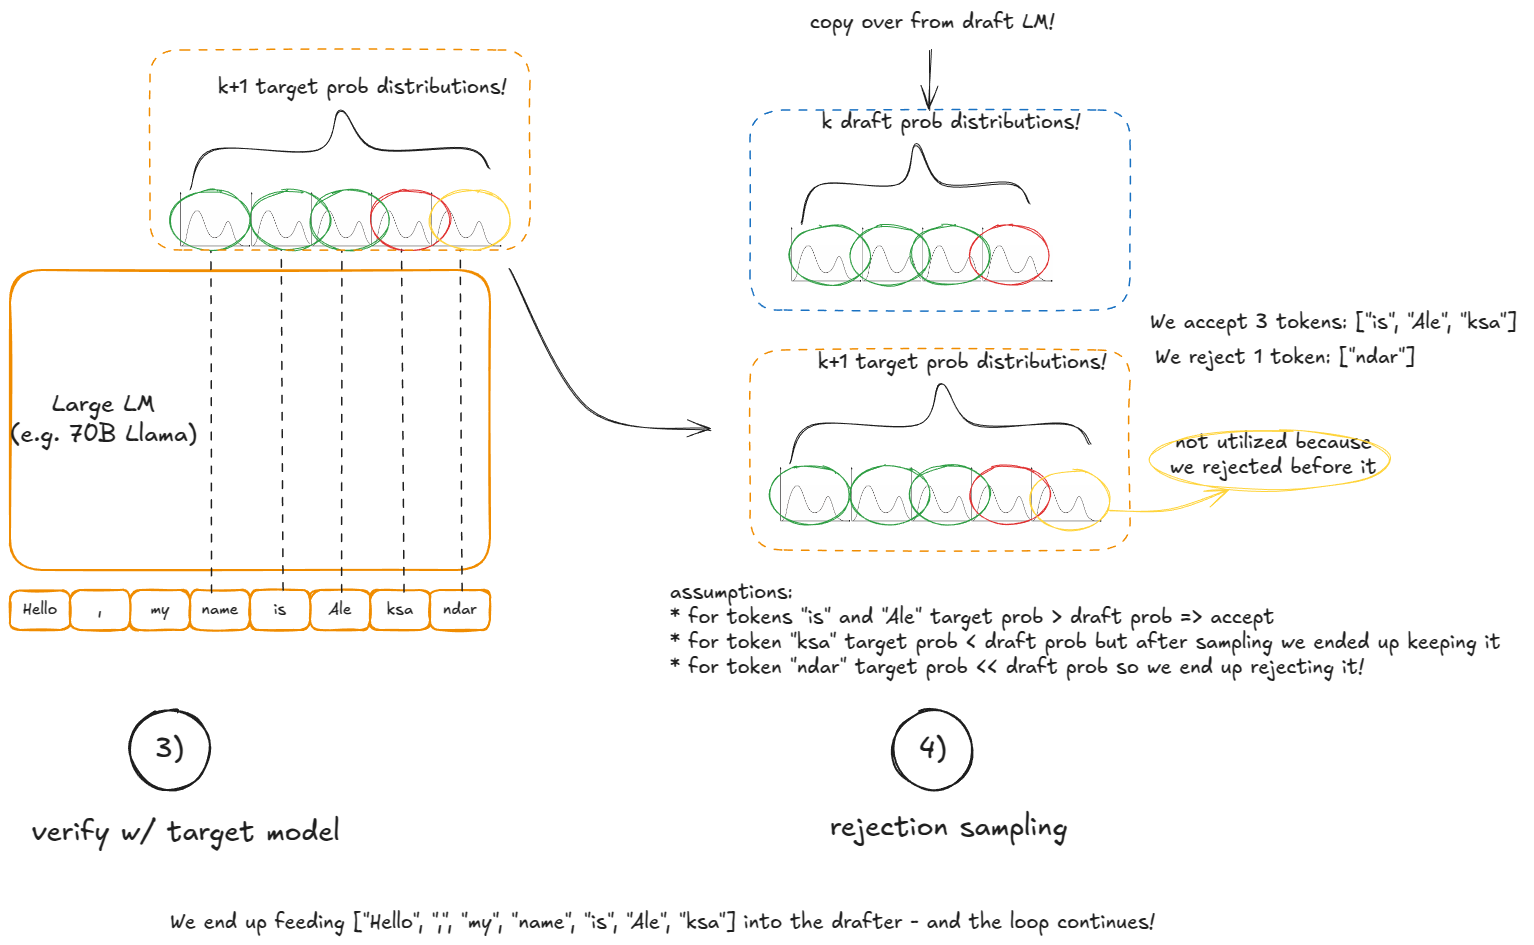
Figure 11: Speculative decoding
Disaggregated P/D
Disaggregated P/D
I’ve already previously hinted at the motivation behind disaggregated P/D (prefill/decode).
前面我已经暗示过 disaggregated P/D(prefill/decode 分离)的动机。
Prefill and decode have very different performance profiles (compute-bound vs. memory-bandwidth-bound), so separating their execution is a sensible design. It gives tighter control over latency — both TFTT (time-to-first-token) and ITL (inter-token latency) — more on this in the benchmarking section.
Prefill 和 decode 的性能画像差别极大(compute-bound 对 memory-bandwidth-bound),所以把它们的执行分开是个很自然的设计。这样能更精细地控制延迟——包括 TTFT(time-to-first-token)和 ITL(inter-token latency)——benchmark 那一节会展开讲。
In practice, we run N vLLM prefill instances and M vLLM decode instances, autoscaling them based on the live request mix. Prefill workers write KV to a dedicated KV-cache service; decode workers read from it. This isolates long, bursty prefill from steady, latency-sensitive decode.
实践中,我们会跑 N 个 vLLM prefill 实例和 M 个 vLLM decode 实例,并根据实时请求构成自动伸缩。prefill worker 把 KV 写到一个专用的 KV-cache 服务,decode worker 从那里读。这样就把又长又突发的 prefill,与稳定、对延迟敏感的 decode 隔离开来。
How does this work in vLLM?
在 vLLM 里这是怎么实现的?
For clarity, the example below relies on SharedStorageConnector, a debugging connector implementation used to illustrate the mechanics.
为了讲清楚,下面的例子用了 SharedStorageConnector——一个用来演示机制、偏调试用途的 connector 实现。
说明
Connector is vLLM’s abstraction for handling the exchange of KVs between instances. Connector interface is not yet stable, there are some near-term improvements planned which will involve changes, some potentially breaking.
说明
Connector 是 vLLM 用来处理实例之间 KV 交换的抽象。Connector 接口目前还不稳定,近期有一些改进计划,会带来变更,其中一部分可能是不兼容变更。
We launch 2 vLLM instances (GPU 0 for prefill and GPU 1 for decode), and then transfer the KV cache between them:
我们启动两个 vLLM 实例(GPU 0 做 prefill,GPU 1 做 decode),然后在它们之间搬运 KV cache:
import os
import time
from multiprocessing import Event, Process
import multiprocessing as mp

from vllm import LLM, SamplingParams
from vllm.config import KVTransferConfig

prompts = [
    "Hello, my name is",
    "The president of the United States is",
]

def run_prefill(prefill_done):
  os.environ["CUDA_VISIBLE_DEVICES"] = "0"

  sampling_params = SamplingParams(temperature=0, top_p=0.95, max_tokens=1)

  ktc=KVTransferConfig(
      kv_connector="SharedStorageConnector",
      kv_role="kv_both",
      kv_connector_extra_config={"shared_storage_path": "local_storage"},
  )

  llm = LLM(model="TinyLlama/TinyLlama-1.1B-Chat-v1.0", kv_transfer_config=ktc)
  llm.generate(prompts, sampling_params)

  prefill_done.set()  # notify decode instance that KV cache is ready

  # To keep the prefill node running in case the decode node is not done;
  # otherwise, the script might exit prematurely, causing incomplete decoding.
  try:
      while True:
          time.sleep(1)
  except KeyboardInterrupt:
      print("Script stopped by user.")

def run_decode(prefill_done):
  os.environ["CUDA_VISIBLE_DEVICES"] = "1"

  sampling_params = SamplingParams(temperature=0, top_p=0.95)

  ktc=KVTransferConfig(
      kv_connector="SharedStorageConnector",
      kv_role="kv_both",
      kv_connector_extra_config={"shared_storage_path": "local_storage"},
  )

  llm = LLM(model="TinyLlama/TinyLlama-1.1B-Chat-v1.0", kv_transfer_config=ktc)

  prefill_done.wait()  # block waiting for KV cache from prefill instance

  # Internally it'll first fetch KV cache before starting the decoding loop
  outputs = llm.generate(prompts, sampling_params)

if __name__ == "__main__":
  prefill_done = Event()
  prefill_process = Process(target=run_prefill, args=(prefill_done,))
  decode_process = Process(target=run_decode, args=(prefill_done,))

  prefill_process.start()
  decode_process.start()

  decode_process.join()
  prefill_process.terminate()
说明
I’ve also experimented with
LMCache[11], the fastest production-ready connector (uses NVIDIA’s NIXL as the backend), but it’s still at the bleeding edge and I ran into some bugs. Since much of its complexity lives in an external repo,SharedStorageConnectoris a better choice for explanation.
说明
我也试过
LMCache[11]——目前最快的、生产可用的 connector(后端用 NVIDIA 的 NIXL),但它还处在非常前沿的位置,我踩到了一些 bug。考虑到它的大部分复杂度都在外部仓库里,用SharedStorageConnector来讲原理更合适。
These are the steps in vLLM:
vLLM 里的步骤如下:
- Instantiation — During engine construction, connectors are created in two places:
- Instantiation —— engine 构造期间,connector 会在两个地方被创建:
- Inside the worker’s init device procedure (under init worker distributed environment function), with role “worker”.
- Inside the scheduler constructor, with role “scheduler”.
- worker 的 init device 流程内部(在 init worker distributed environment 函数里),角色是 “worker”。
- scheduler 构造函数内部,角色是 “scheduler”。
- Cache lookup — When the scheduler processes prefill requests from the
waitingqueue (after local prefix-cache checks), it calls connector’sget_num_new_matched_tokens. This checks for externally cached tokens in the KV-cache server. Prefill always sees 0 here; decode may have a cache hit. The result is added to the local count before callingallocate_slots. - State update — The scheduler then calls
connector.update_state_after_alloc, which records requests that had a cache (no-op for prefill). Build metadata object— At the end of scheduling, the scheduler callsmeta = connector.build_connector_meta:
- Cache lookup —— scheduler 处理
waiting队列里的 prefill 请求时(在本地 prefix-cache 检查之后),会调用 connector 的get_num_new_matched_tokens,去 KV-cache 服务里查外部缓存了多少 token。prefill 这里永远是 0;decode 可能命中。结果会在调用allocate_slots之前加到本地计数上。 - State update —— 接着 scheduler 调用
connector.update_state_after_alloc,记录下命中了缓存的那些请求(对 prefill 是空操作)。 - Build metadata object —— 调度结束时,scheduler 调用
meta = connector.build_connector_meta:
- Prefill adds all requests with
is_store=True(to upload KV). - Decode adds requests with
is_store=False(to fetch KV).
- prefill 把
is_store=True的请求加进去(要上传 KV)。 - decode 把
is_store=False的请求加进去(要拉取 KV)。
- Context manager — Before the forward pass, the engine enters a KV-connector context manager:
- Context manager —— forward pass 之前,engine 进入一个 KV-connector context manager:
- On enter:
kv_connector.start_load_kvis called. For decode, this loads KV from the external server and injects it into paged memory. For prefill, it’s a no-op. - On exit:
kv_connector.wait_for_saveis called. For prefill, this blocks until KV is uploaded to the external server. For decode, it’s a no-op.
- 进入时:调用
kv_connector.start_load_kv。对 decode,这会把 KV 从外部服务加载进来并注入 paged memory;对 prefill 是空操作。 - 退出时:调用
kv_connector.wait_for_save。对 prefill,这会阻塞到 KV 上传到外部服务为止;对 decode 是空操作。
Here is a visual example:
一个可视化的例子:
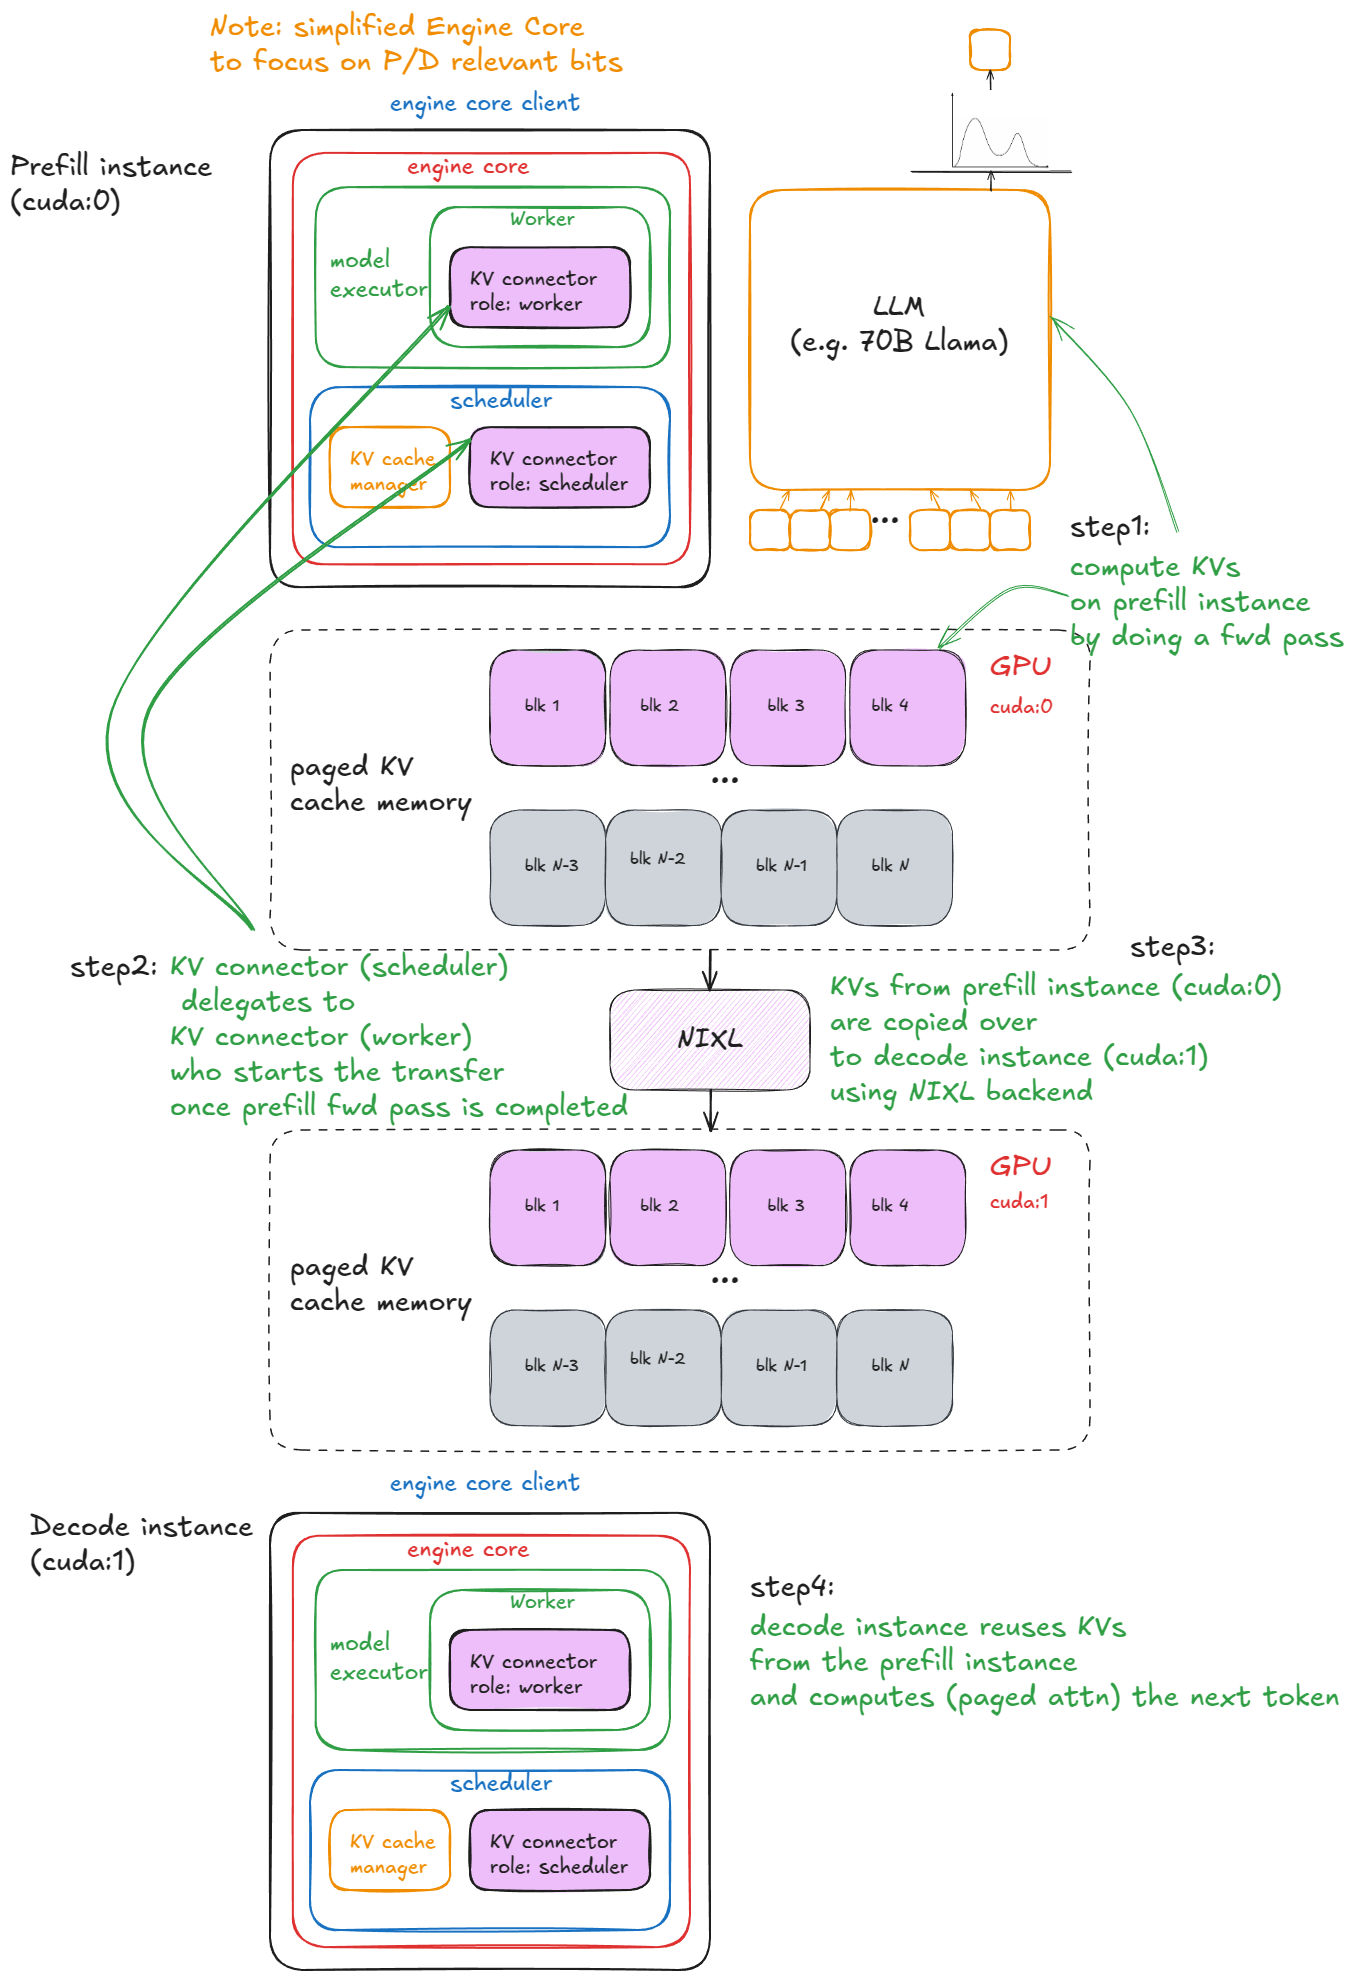
Figure 12: disaggregated P/D
Additional notes:
- For
SharedStorageConnector“external server” is just a local file system.- Depending on configuration, KV transfers can also be done layer-by-layer (before/after each attention layer).
- Decode loads external KV only once, on the first step of its requests; afterwards it computes/stores locally.
补充说明
- 对
SharedStorageConnector来说,“外部服务”就是本地文件系统。- 视配置而定,KV 传输也可以逐层进行(在每个 attention 层之前/之后)。
- decode 只在它那些请求的第一步加载一次外部 KV;之后就在本地计算/存储了。
注释
- “Accelerating Large Language Model Decoding with Speculative Sampling” —— https://arxiv.org/abs/2302.01318
- “EAGLE: Speculative Sampling Requires Rethinking Feature Uncertainty” —— https://arxiv.org/abs/2401.15077
- “Medusa: Simple LLM Inference Acceleration Framework with Multiple Decoding Heads” —— https://arxiv.org/abs/2401.10774
- LMCache —— https://github.com/LMCache/LMCache
讨论
这里是静态站点,没有内嵌评论区。如果这篇文章对你有用,欢迎通过 RSS 订阅后续更新。